2012-03-20
Building and Running Boot To Gecko on the Nexus S
Update 2012-03-29 - The Nexus S port has moved to an ICS base system and the existing Gingerbread base no longer works correctly. I’ve adjusted the instructions below to build the ICS based system. It just involves using ‘config-nexuss-ics’ instead of ‘config-nexus’.
Last year Mozilla announced the Boot to Gecko project - a mobile OS based on web technologies. Recently it was demoed at MWC 2012. Work is being done to improve video playback on B2G using hardware codecs in bug 714408.
I’ve built and run B2G on the emulator before but I wanted to try it out on real hardware to test the video support and play around with the OS. I upgraded my main phone to a Galaxy Note recently leaving a my Nexus S spare for trying different ROMS on it. Support for the Nexus S has started becoming available for B2G (previously the main consumer phone for testing was the Galaxy S II) so I gave it a try. The Nexus S I have is the GSM (non-4G) version. The steps to get the source code:
$ git clone git://github.com/andreasgal/B2G
$ cd B2G
$ make sync
This takes a long time (on New Zealand networks anyway…). Multiple gigabytes of git submodules are cloned.
You’ll want to make sure you have a build environment set up, as per this MDN article so that ‘adb’ and other android tools work. Once done, configure for a Nexus S build:
$ make config-nexuss-icsThis will download binaries for the phone and get you to confirm a bunch of licenses. To build:
$ make gonk
...
$ make
...
The ‘gonk’ make invocation builds the underlying android layer. The following ‘make’ builds gecko and related parts of B2G. Once those are completed you can flash the phone with the result. Note, you do the following at your own risk! You’re flashing your phone, overwriting everything, with experimental, possibly buggy software.
To flash a Nexus S you need to have unlocked the bootloader. If you haven’t done this yet, boot into the bootloader (hold the up volume key down while pressing the power button) and run:
$ make unlock-bootloaderThis runs “fastboot oem unlock” which is the command to unlock the Nexus S bootloader. You’ll need to agree to it on the phone. I also installed the CyanogenMod recovery firmware but this is optional. Instructions to do that are here.
To flash, boot the phone into recovery mode (Hold down the up volume key while pressing power, from the menu that appears choose ‘Recovery’), plugin in the USB cable to your PC. Run:
$ make flash-only‘flash-only’ will flash your B2G build onto the phone. You’ll lose everything on the phone, sorry.
If your Nexus S was running a 2.3 based Android this should just work. If it was running ICS (as mine was) then you might get an error about unsupported baseband and/or bootloader versions. If you get this, I fixed it by editing ‘glue/gonk/device/samsung/crespo/board-info.txt’ to add the versions that my bootloader and baseband had. My file looked like:
require board=herring
require version-bootloader=I9020XXJK1|I9020XXKA3|I9020XXKL1
require version-baseband=I9020XXJK8|I9020XXKB1|...|I9020UCKE1|I9020XXKI1
Note the addition of ‘I9020XXKL1’ and ‘I9020XXKI1’ to the bootloader and baseband lines respectively. After editing I redid “make gonk”, “make” and “make flash-only”.
After ‘flash-only’ your phone will reboot. If it boots into an error box saying “no homescreen found” then do the following while the USB cable is connected and that error is showing:
$ make install-gaia
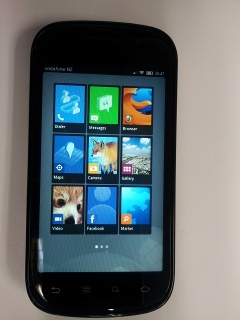
$ adb rebootThis will install the user files and reboot the phone. B2G should now be running on the device. Enjoy! I’ve found calls, text messages, Wifi and Web Browsing works.